Blink now captures fantastic low-light GIFs

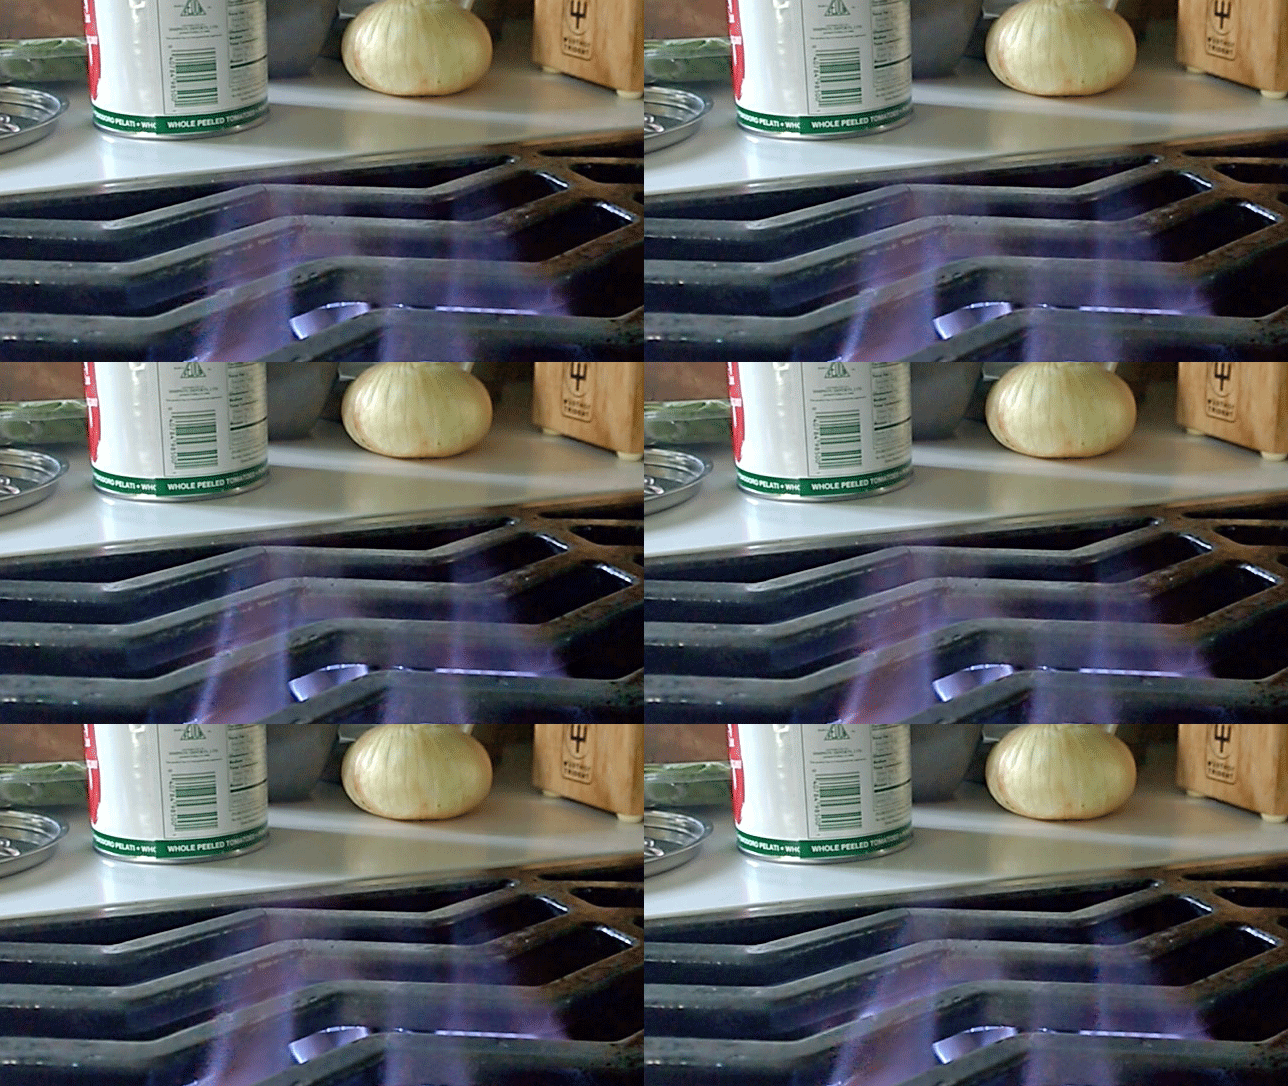
Today we are releasing an update to the Blink App (available in the Windows Phone store). The update includes a variety of bug fixes and a major new capability. Blink now automatically removes noise from low-light captures. As pointed out in previous posts Blink has always featured an advanced stabilization algorithm. This algorithm makes a hand-held capture look as if it was captured from a stable tripod. Once an image sequence is stabilized we may still see some frame to frame differences in the form of image noise, this is especially apparent in low light conditions. An example of this is the left hand GIF below captured with the previous version of Blink, notice the noise (aka grain) visible in the sequence. The right hand GIF is what the new version of Blink will automatically produce. Notice the almost complete removal of noise in the still regions while maintaining crisp motion in the moving regions.
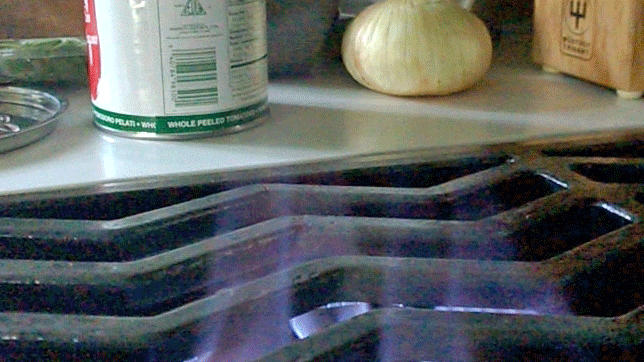
source
result

Several more examples are available on the Blink site. This noise removal was achieved by a new algorithm that runs after stabilization. Blink automatically analyzes the motion in the scene. Where the motion can be stabilized the algorithm effectively performs a very long exposure by merging the entire Blink sequence, where the motion can’t be stabilized the sequence is left untouched. One way to think of this is optical image stabilization on a region by region basis. Instead of simply stabilizing the entire frame and blurring moving objects, Blink performs the merge selectively. For those interested in the deep details of this technique, it will be presented at the SIGGRAPH Asia conference in December. In the meantime give it a try on your Windows Phones.

Matt Uyttendaele on behalf of Blink team

Posted in Uncategorized | 2 Comments

Image Watch Version 1.5 Released

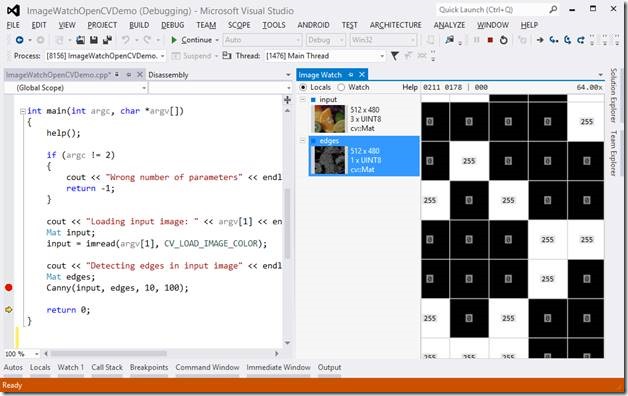
We are excited to announce the latest update to Image Watch (Version 1.5). Image Watch is our Visual Studio plug-in for debugging C++ image processing applications. It adds a new control to Visual Studio that displays images in memory as you step through your code in the debugger.

clip_image002

Inspecting an in-memory edge image (at 64x magnification) while debugging.

The latest update includes a number of bug fixes and new features inspired by user feedback in the Image Watch Q&A. For example, pixel values are now shown as text on the pixels themselves when zoomed in all the way (see screenshot). We also added support for visualizing custom bit depth integer formats and 16bit float format. The complete list of changes can be found in our release notes.

Posted in Uncategorized | 1 Comment

BLINK update available in Windows Phone Store

We are excited to announce the latest update (version 2.2) to the BLINK app for Windows Phone 8. You can get the app for windows phone from here.

The latest update brings a number of new features:

Continuous Auto-focus

Since BLINK captures frames both before and after the user triggers the capture, one of the issues in the previous version was that users could potentially get a focus sweep in the captured. This could lead to the sequence having a few blurry frames. With the latest version, we added a new feature that does continuous auto-focus – we automatically refocus whenever required. Focus is triggered based on a few different criteria. We now have a fast face tracker running on the phone that is continuously monitoring the preview feed. If we find a suitable face(s) we focus on the face, as the people are presumably the subject of the photograph. We also monitor the phone’s orientation and movement continuously through the phone’s motion sensors and monitor image statistics to see how much the image in view is changing. If no faces are present, a focus is triggered once a reasonable movement of the phone is detected or the statistics of the scene have changed appreciably.

We do also retain the ability to manually trigger the autofocus mechanism through the half-press of the dedicated camera button and release, which the user can use if needed.

clip_image002

Happy developers with faces

Better Stabilization

One of the important aspects of BLINK is the image alignment algorithm that runs right after a capture and stabilizes the frames in the sequence. This has the useful effect of minimizing frame-to-frame changes that could occur from hand shake or other jitter while capturing. The frame-to-frame difference are not noticeable when viewing an individual frame, but can be readily seen as the user scans through the sequence by moving the frame picker or while playing the sequence. In BLINK the stabilization algorithm removes distracting hand shake motion and helps users see the more important changes from frame to frame.

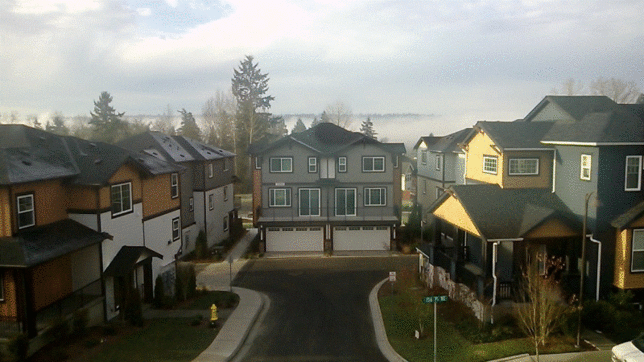
With the new update we have significant improvements to the stabilization algorithm. The stabilizer runs by identifying salient image features in each frame and tracking them through the sequence. We now have improved the stabilizer to (a) choose a better subset of features (b) use a more representative model for the change between frames. As a result we get really good stabilization as you can see in the sequence below.

blink_gif

This is a hand held sequence playing back and forth but can you see any motion?

GIF encoding and upload to Skydrive

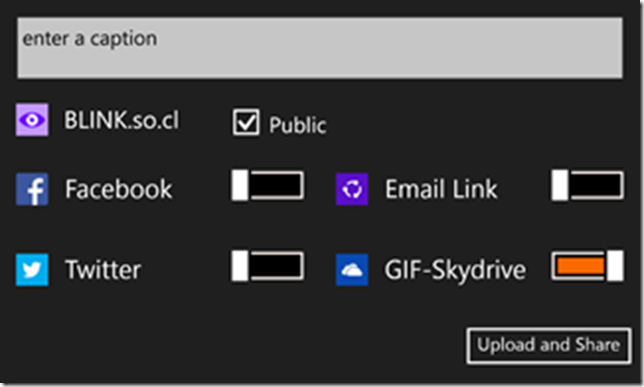
Once of the highly requested features by users of BLINK is the ability to encode and share the BLINK sequences in the highly popular GIF format We listened, and with this update users will be able to select Skydrive as one of their share destinations and the BLINK sequence will be encoded to a GIF and uploaded to Skydrive. Once on Skydrive, the user can view the GIFs playing through Skydrive’s web viewer or can download the GIF for other uses.

clip_image005

The share screen in BLINK

Metadata encoding

With the new update we also added image metadata encoding in the images that are saved via BLINK. Users will now find the date, time and the location information in the EXIF data (image properties) of the images that they saved through BLINK to the phone camera roll. Users can then use this information for sorting and other purposes.

Posted in Uncategorized | 1 Comment

JPEGXR updates

Based on feedback from many collaborators, we are providing a few updates to the previously released JPEGXR software. In this post we are also providing an analysis comparing our JPEGXR implementation to WebP.

  • In the jxrlib GIT https://jxrlib.codeplex.com/releases, version 1.1 is now available.  This release implements a slightly refined encoder quality. This means that setting the 0 – 100 quality value in the encoder library now translates to different encoder parameters, which should, in most cases, result in improved perceived image quality. The update also includes several community-contributed extensions to perform pixel format conversions.
  • The Photoshop plugins for Windows and Mac have also been updated. The new plugin includes the refined encoder quality implementation and an improved handling of Photoshop alpha layers.

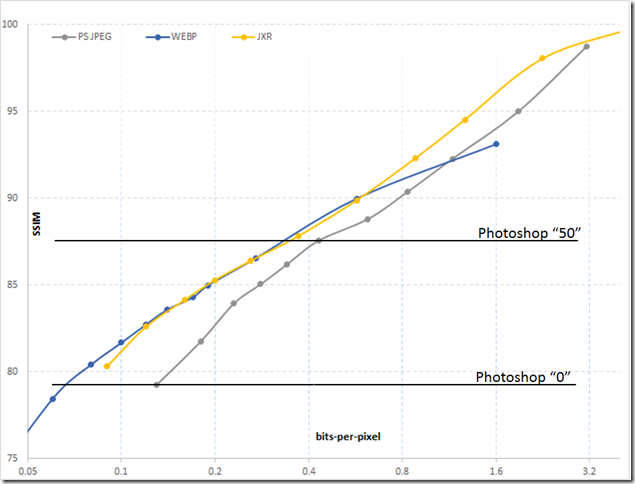
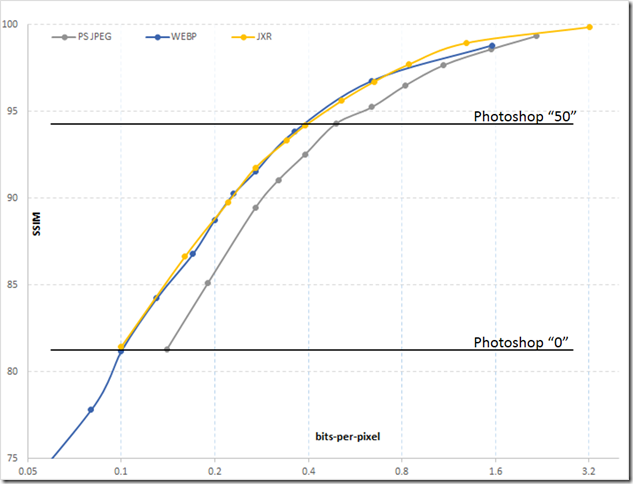
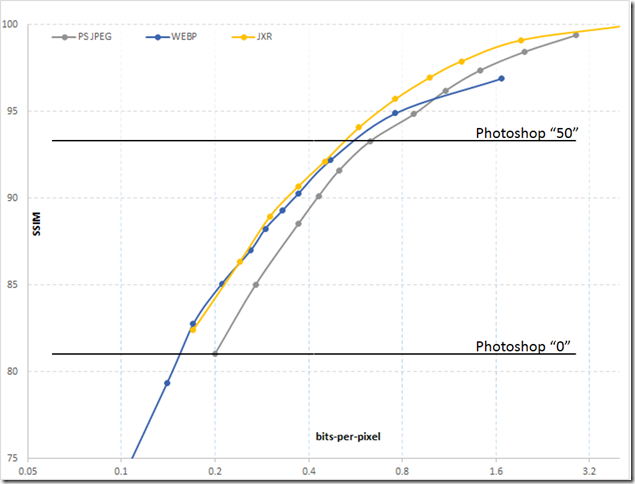
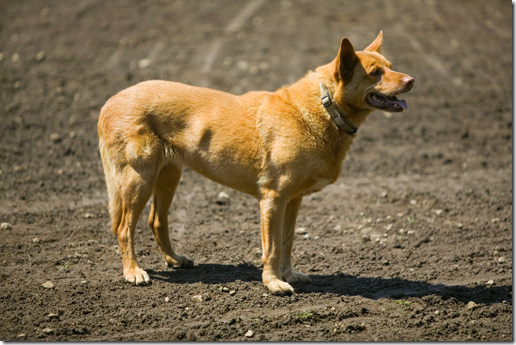
Using our 1.1 JPEGXR encoder, we performed  an analysis of JPEGXR with the same methodology as the WebP vs. libjpeg study done by Google (https://developers.google.com/speed/webp/docs/webp_study#exp2). In our analysis we use the same images as in the Google study and encode them via JPEGXR, WebP, and Photoshop’s “Save for Web” JPEG encoder. For each encoder we sweep through 10 quality values* and plot the rate distortion curves (bits per pixel vs. SSIM)**.

ssim_lena_edit

Figure 1: Lena

ssim_kodim19_edit

Figure 2: kodim19.png

ssim_RGB_OR_1200x1200_061_edit

Figure 3: RGB_OR_1200x1200_061.png

In these graphs there are several interesting things to point out.

  • JPEGXR outperforms WebP in the high end of the quality range and equals or marginally beats WebP in the low end of the quality range.
  • Both WebP and JPEGXR handily outperform JPEG at low-quality settings.
  • WebP does not outperform JPEG at high-quality settings (Photoshop quality slider set to 80 or above), while JPEGXR does.
  • In each of the graphs, I have labeled what Photoshop has implemented as quality “50” and quality “0” (on a scale of 0-100).  Much of the Google analysis reports on quality below “50.”  I don’t know how many photos are saved out of tools like Photoshop at such low quality, but I would guess not many. In the above “50” portion of the quality range, our JPEGXR implementation clearly outperforms WebP.

Since the last blog post, we’ve been asked several times how JPEGXR compares to WebP. So we are providing the above rate-distortion curves. Of course, this is only one factor, albeit a very important one,  to consider. As pointed out in the last post, JPEGXR has many other interesting features, such as continuous quality from lossless to lossy, alpha channels, HDR, and compressed domain operations. And JPEGXR is an international  standard — many of these features are not currently applicable to WebP.

Matt Uyttendaele

* sweep from 0 to 100 in steps of 10

** pixel-count = width*height*3 (from Google’s scripts), SSIM is the average of red, green, blue

Posted in Uncategorized | 13 Comments

JPEG XR Photoshop Plugin and Source Code

Today we are making several JPEG XR announcements:

JPEG XR is an approved ISO/IEC International standard (its official designation is ISO/IEC 29199-2). See more information in the press release from the JPEG Committee. JPEG XR started its life in Microsoft Research. It publicly first appeared as the HD Photo format, 7 years ago in Windows Vista. Microsoft submitted HD Photo to the JPEG committee and it emerged 2 years later as a new standard. Thanks to the excellent work by the committee, the standardization process resulted in several changes to the original specification. This robust peer review has led to a better product for end users (compared with one entity defining a new format). JPEG XR support is included in many Microsoft products, most importantly Windows 7, Windows 8, and IE10.

For web developers, JPEG XR has a large number of interesting features, see the table below. Some of these are big advantages over other image formats like JPEG, PNG, OpenEXR, and TIFF.

Better Compression

On average the file size will be 40% smaller than JPEG for similar quality. In addition the compression artifacts in XR are less objectionable than JPEG so there is often more file size savings available.
Lossless Mode The lossless mode in XR achieves better compression than PNG (especially for natural images).
Alpha Channel XR supports an alpha channel, unlike JPEG. PNG does support alpha, but, unlike PNG, XR has the capability to compress color lossy and alpha losslessly. This capability results in much smaller file sizes.
Extended Bitdepth XR supports 8-, 16-, and 32-bit/channel, this means that it can store either RAW images or HDR images without losing precision. This coupled with sophisticated compression achieves smaller file sizes than other formats like TIFF, RAW, or OpenEXR.
Progressive Decode IE10 leverages the XR progressive download mode.
Advanced Decoding Features
  • XR images can be cropped, rotated, flipped, and resized all in the compressed domain.
  • The tile-based layout of an XR file allows for efficient region-of-interest access.


I’ll end with two simple demonstrations of how XR compares with JPEG.

P09

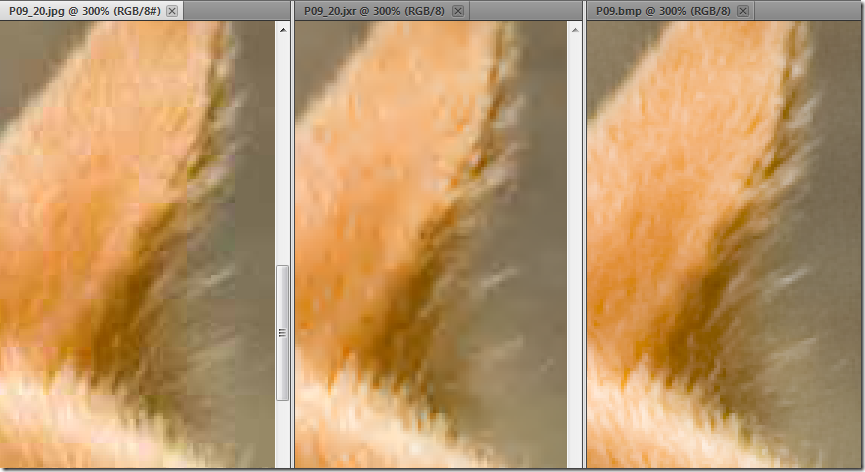
I compressed the picture above using both our Photoshop plugin and Photoshop “Save for Web & Devices …”  In each case I set the quality to a fairly low ‘20’ setting. Note that we have tuned the JPEG XR plugin quality sliders to match Photoshop’s JPEG encoder quality slider. This means that for a given setting you should get a comparable ‘quality’ but the JXR file size will always be smaller. In this case the original 32MB uncompressed image compressed to a 703KB JPEG file and a 453KB JXR file (36% savings).  Zooming in on an area of the ear we also see that the types of compression artifacts present in the JXR are less apparent than the familiar “blocking” artifacts of JPEG (the rightmost slice is the original).

image

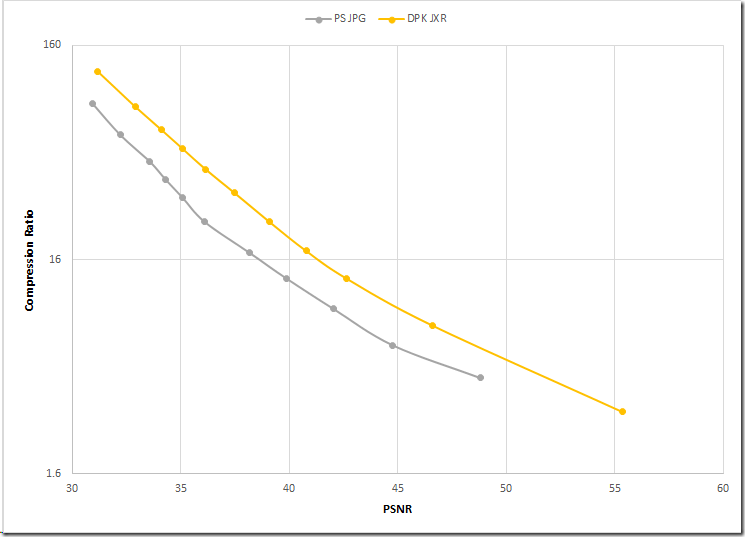
For this same image, I plot a sweep of the quality slider from 100 to 0 for both JPEG and JPEG XR. The X axis is PSNR (a measure of quality) and the Y axis is the amount of compression. Several things to point out here – (1) JPEG XR consistently achieves higher compression (smaller files), and (2) notice the extreme right side of the graph; JPEG XR can achieve higher quality than JPEG. In fact, the quality slider represents a continuous scale of lossless compression at ‘100’ to progressively more lossy.

image

This post gives a very quick introduction to JPEG XR. For those who want to learn more, I encourage you to start with the Wikipedia page, and Bill Crow’s blog. Also, please do give us feedback on our new source code and Photoshop plugin releases in the comments below.

Matt Uyttendaele

Posted in Uncategorized | 38 Comments

View iOS6 Panoramas on Photosynth

I was just trying out the new panorama feature built in to iOS6 (available on the iPhone 4S and 5).  The resulting panoramas look great, but one thing that I miss compared with Photosynth is the ability to view the result as a true “surround” experience. I was curious if I could work out the geometry of the iOS panoramas so that they could be uploaded to http://photosynth.net, and then be available to view anywhere–on the web or in the Photosynth App.

The quick answer is yes.  You need to get the Photosynth Export Plug-in for Photoshop. When you run the plug-in, select “Cylindrical (Horizontal)” from the “Projection” menu, and determine the “Field of View” of your panorama by taking the width of the image and dividing it by the magic number 53.5.

Here are two panoramas that I uploaded using this technique: Seattle 12th Street Bridge and Seattle Yesler Bridge.  If any readers try this out, please send us a link to the result via the comments or on Twitter.

That’s it.  But, if you want to know where 53.5 comes from, continue reading.

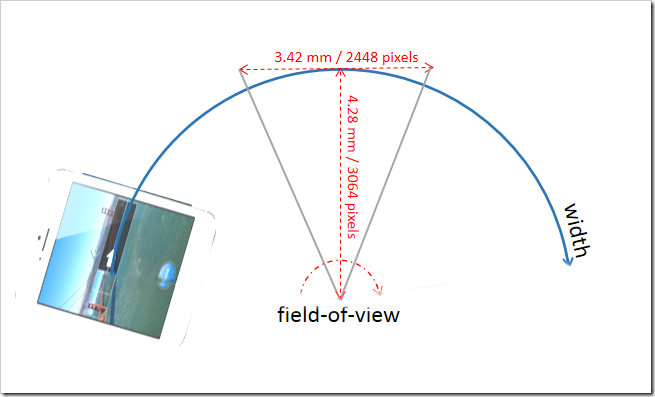
The figure below shows the iPhone sweeping out a panorama. I’m assuming that iOS reads the pixels from the camera and “projects” them onto a cylinder in order to form the panorama.  The cylinder is represented as the blue path in the figure. The length of this path is equivalent to the width in pixels of the panorama that was captured.

FOV

What the plug-in needs is the field of view (FOV) in degrees. From geometry we know that 

width = FOV  * radius

What is the radius in this case?  It is simply the focal length of the camera. Searching the web, we find that the 4S has a focal length of 4.28mm. Now we have a problem of units; we know the focal length in millimeters and the width in pixels. To convert between these units we can find out that the 4S sensor size is 3.42mm wide or 2448 pixels wide. Now we have our conversion; the radius in pixels is

radius = (2448/3.42) *4.28 = 3064 pixels

Finally

FOV = (width / 3064) * (180/p) = width/53.5

I haven’t yet found the sensor size and focal length of the iPhone 5, so 53.5 may not be the right number for that phone. Post a comment if you know.  I also think that a very similar calculation could be done for the Sony cameras with the sweep panorama feature.

Matt Uyttendaele

Posted in Uncategorized | 1 Comment

Microsoft Camera Codec Pack offers RAW support in Windows

Last week the Windows Live Essentials team announced the release of the Microsoft Camera Codec Pack. The announcement focused on how the codec pack enables Photo Gallery and Windows Explorer to view RAW images. What wasn’t mentioned is that it also allows any other Windows application to open RAW files. This is important for Image Composite Editor users as there is now a high-quality and free method of importing RAW images into ICE.

I emphasize high-quality and free because ICE has in fact supported RAW images since last year, when I blogged about it. RAW support in Windows, and thus ICE, was available via a “plug-in.” Windows allows any third-party software vendor to extend which image types are supported in the operating system. Based on my own observations of ICE users, the “plug-in” strategy confused many. 

One source of these plug-ins is the camera manufacturers, like Canon and Nikon.  Unfortunately, they mostly do such a poor job developing and supporting their software that it made Windows, and other applications that relied on it, look bad. We have updated our codecs page to reflect this and strongly discourage anyone from installing the Canon or Nikon software. Another source is vendors who sell high-quality and well-supported plug-ins that cost $15 and up. However, many of our users felt that they shouldn’t need to pay for a feature that they expect to be built into a modern operating system. Mostly though, users simply assumed RAW wasn’t supported in Windows. Judging by the reaction from tech journalists (see “Windows Finally Gets RAW Image Support” 1, 2, 3) this notion was pretty widespread.

We have updated the WIC Codecs for Image Composite Editor page and added the new Microsoft codec pack to our recommended list. We also still recommend Fast Picture Viewer (FPV) for RAW files that aren’t supported by the Microsoft codec pack. Additionally, FPV is recommended if you have a need to use less common file formats, such as HDR and OpenEXR, in ICE.

The new Microsoft codec pack is available here: http://www.microsoft.com/download/en/details.aspx?id=26829. There is some great technology built in. The Windows Live team has built a sophisticated lab for characterizing cameras to ensure high-quality output from the RAW decoding process, and the RAW codec is built to take advantage of multi-core PCs, so it should be very fast.

Matt Uyttendaele

Posted in Uncategorized | 1 Comment

ICE twitter feed, new forum, minor update

A few quick ICE announcements.

We have a new Microsoft ICE specific twitter feed:  http://twitter.com/#!/MicrosoftICE  Please follow us to hear the latest ICE related goings on.

The ICE forum has moved.  It is now at: http://social.microsoft.com/Forums/en-US/ice/threads

A minor update of ICE is available at: http://research.microsoft.com/en-us/um/redmond/groups/ivm/ice/  Current users should be prompted to update when starting ICE.

Posted in Uncategorized | Leave a comment

Panorama Stitching on your iPhone

The Photosynth team today released a beautiful new app for the iPhone.  This lets you interactively create panoramas directly on your iPhone.  When you enter the app it will show you an interactive preview of what you are capturing – very useful to make sure that you’ve captured everything you want.  Then you hit “Finish”, and it renders out a seamlessly stitched result that you can upload to a variety of web services.

Of course, you can upload to Photosynth.net to get a full immersive viewing experience, but you can also upload a flat version of the image directly to Facebook.  In either case this app allows you to share your panorama just moments after capturing it.

The app nicely complements the rest of the panorama creation tools available for Photosynth.  At the high end, we offer the Photoshop plugin, which lets you create and edit a panorama with whatever tools you want.  For a more automated solution on the PC, we offer Microsoft ICE with direct uploads to Photosynth.  And now for the mobile phone, we’re making this app available.  In addition to creating panoramas, the app is also a great way to view them.  For any panorama that you’ve created using any of the tools above, you can now use the app to view them on the iPhone as a fully interactive surround-video experience.

The Photosynth app is available now for iOS (iPhone 4, iPhone 3GS, iPod Touch 4th generation, and iPad 2) in the iTunes App Store.

Matt Uyttendaele

Posted in Uncategorized | 2 Comments

Microsoft ICE update–video to panorama, lens vignette, improved blending

We are pleased to announce our latest update to Microsoft ICE.  The download is available by following these links:  ICE for 32 bit Windows  -or-  ICE for 64 bit Windows

After installing, you will find some exciting new features.

Stitching From Video

The first is that ICE can now automatically stitch a panorama directly from video.  One fun use of video panoramas is “motion summaries,” like this result that ICE produced:

Ski jump 4

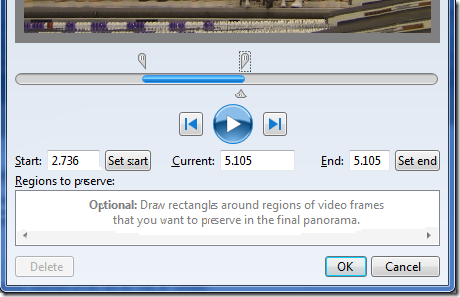
In this video the photographer was panning the camera to follow the motion of the snowboarder.  I used ICE to indicate “Start” and “End” points, and I gave a few hints about which video frames wvideodlgere interesting. The motion tracking and final composition was then done automatically by ICE.  You can access this feature by selecting “New Video Panorama” from the File menu.  This will bring up the Video Panorama dialog (shown to the right), where you can play or single-step through videos in order to choose start and end points. You can also optionally draw regions of interest on individual video frames to ensure that certain elements are present in the final composition. ICE supports most common video formats (avi, mov, wmv, and more).  Of course the results can also be uploaded to Photosynth. Note that this particular feature is only available for ICE running on Windows 7 (for other versions of Windows this menu item will be disabled).

Video is also a great way to quickly capture a panoramic scene.  For example, here a two-minute video was automatically turned into a panorama (this was shot with a Samsung Focus Windows Phone).

Automatic Vignette Correction

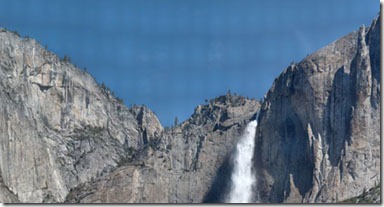
YosemiteFallsCropOrig

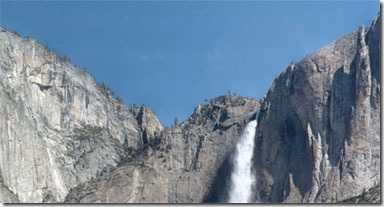
Lens vignetting is the effect of the center of a photograph being brighter than the periphery. This effect can be especially apparent when stitching photos. For example, notice the repetitive pattern in the sky in the above panorama.  This is caused by lens vignetting in the constituent images. In this ICE update, lens vignetting is automatically detected and removed.  The result is shown below.

YosemiteFallsCropDevig

Improved Blending

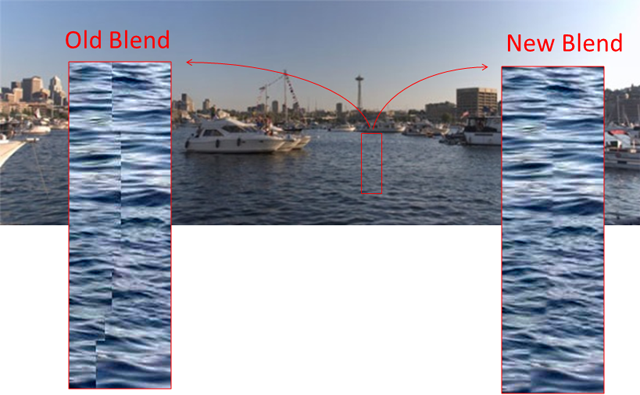
The new version of ICE has a new blending engine. Previous versions did blending by applying a color adjustment to the panorama source images such that there would be minimal visible differences between them. In some cases, this strategy couldn’t adequately hide the seams. For example, in the panorama below, the seam in the  moving water could not be completely hidden by color adjustment alone. In the new version of ICE we still run the color adjustment step, but where this is inadequate, we also do an intelligent fade between the images. This helps a lot in cases like the one below as can be seen in the two breakout panes.  Click on the image below to explore it in full resolution on the Photosynth website; you should find it very difficult to discover the seams between images.

blending

And More

In addition to the above main features, we have also made a few other enhancements:

    • An options dialog to control scratch disk location and ICE memory use.
    • Enable perspective projection for wide field-of-view panoramas
    • 1/3 less disk usage when stitching large data sets
    • ICE is now more robust to corrupt metadata in source photos

Matt Uyttendaele ICE lead

with video stitching by: Neel JoshiEric Stollnitz, Paramjit Sandhu; lens vignette removal by: Sing Bing Kang, Howard Good; and improved blending by: Rick Szeliski, Drew Steedly

Posted in Uncategorized | 31 Comments